I’ve created a template in Reaper in order to help my workflow in future tracks. So here’s a brief explanation on what I’ve done, why I’ve done it, and how it’s been designed to aid me in my compositions and song writing. First of all, here’s a screen shot of the arrangement view, and I’ll go through exactly what I have available to me when I first open up Reaper.
The Tracks
Ideas Track – This is simply a Piano running in Kontakt. It means that a soon as I open up my project, I can start playing around with melody/harmony ideas. I can record these and copy them into my other tracks however I want.
Drum Bus – This is an accumulation of Battery 3 and some of my favorite samples. I’m currently trialing using Battery, as mentioned in previous posts, I used to use Ableton, and I had similar samples loaded up in a Drum Rack, but seeing as I’ve not invested in the Komplete 8 package, I thought I’d take advantage of using a more advanced sampler. Battery is sending out the different samples into a number of busses that I’ll briefly talk about later.
Impacts – Here I have a a few audio tracks where I can simply drop samples of ‘impacts’ or ‘explosive’ types of sounds, to layer up the texture of a track.
Synths – Within this group of tracks, I have a few different basic synth patches that I’ve created as defaults that I can then manipulate and change to suit the track I’m writing. Currently, these are simply different versions of Massive, but I’ll soon change them to different synths depending on what I’m writing and what I need them for.
Vox – I have a simple mic set up in the studio, in case I want to lay down some vocal ideas, so these are simply audio tracks hooked up to my soundcard for those purposes.
Air/Sweeps – These are a few audio tracks for me to drop samples of sweeps/swooshes/wwweeeeeee sounds. However you want to describe them. These are often used for build-ups or texture purposes. ‘Air’ (such as wind, vinyl noise etc) can be used to open up a track, and add that room to breath. I can make a track feel more natural/organic, a technique used by a number of different producers.
Effects – This is a group of general effects most commonly used on my productions, and we’ll look at these in further down.
The Mixer
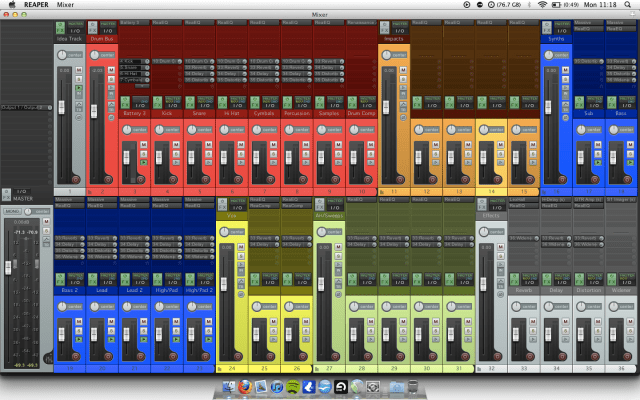
So here’s the mixer… You may have noticed that I’ve colour coded the different groups. This is simply so that it’s easier for me to see what’s where, so that I can quickly find what I need. This also makes it easier if I’m collaborating with people. They can easily look at each main group (the larger fader) and then look at the individual instruments within that track. Obviously whilst working on a track, and can change labels and make a more relevant or detailed connection between the name and the sound. Currently they’re simply things like ‘Sub’, ‘Bass’, ‘Lead’, etc.
On each track I’ve placed a flat EQ to be edited later. I believe you should never use ‘stock’ EQs. What I mean by that is you shouldn’t presume that even if you’re using the same sound/sample, that the EQ should be the same for every track your working on. Each track will have a different feel/sounds that will interact with each other differently, so they will require different EQs for each song your working on.
You may notice that I have then set up sends on different tracks to their most commonly related effect. In general Reverb will be used on most tracks, Delay, Distortion and a Widener will only be used on particular tracks, dependent on the song itself.
I haven’t placed any compressors on any of the tracks apart from a simple Drum Bus compressor. This is purely for the same reason as the EQs. You will not always need to compress a sound, so what’s the need to having it there until you need it?
Structure
You may have noticed this on the arrangement view. I have used regions and markers to help the structure of my compositions. This is something that I have sometimes struggled with in the past. It’s not that I can’t structure my pieces, but this is a simple way of reminding me about it. I’ve used a standard structure found in a lot of electronic music such as Dub-Step or House music. The markers half-way through each region are simply to remind me about introducing something new, and the are colour coded to remind me about the relations between sections etc.
I believe this template is going to help a great deal in my workflow, and in my creative flow. It will help me to sit down, and start with creating the music first, creating the instruments, and then finally producing. Hopefully I won’t get lost in what I should be doing, and this will help me to keep organized in the future a lot more. Below are a couple of video that helped to make me realize a few of these ideas, with thanks to Vespers and Dodge & Fuski. They can seem cheesy, but they’re completely relevant for people in my position and within the industry…


